Visual merchandising is the practice of displaying your product and organizing your store to drive sales, enhance your brand, and provide a stimulating and enjoyable shopping experience for customers. This article and our corresponding video outline a dozen of the most important visual merchandising techniques and how to implement them in your business.
Key Takeaways
- Use visual queues: Color, lighting, signage, and blank space all help set the tone for your store and draw attention to your products.
- It all starts with your layout: Your floor plan controls traffic flow and sets the stage for the shopper experience.
- Make it easy to buy: Signage, point-of-purchase displays, seasonal product placement, and a clean, well-organized store with clear aisles allow shoppers to focus on buying.
1. Direct Customer Traffic With Your Store Layout
A store layout refers to how shelving and furniture pieces are arranged in your store and how this impacts traffic flow, customer movement, and shopping experience. Store layout can affect what customers are drawn to, how long they choose to stay in your store, and how they move in your space. Ultimately, it can influence the story your store is telling, and the sales you can generate.
Types of Store Layouts
In general, there are nine types of store layouts you can choose from, each providing different opportunities for your merchandising. When deciding what layout is best for your store, you will want to consider the volume of product, the space you have, how you want to showcase your merchandise, and the traffic flow in your store.
For more detailed information and guidance on how to plan your store layout, check out our article on planning your store layout. Alternatively, you can download our free store layout checklist for a comprehensive guide to setting up your store.
2. Use Color to Create a Cohesive Visual Experience
Colors play a huge role in retail visual merchandising because color psychology shows customers respond differently to specific color palettes.
A uniform color palette will help create a cohesive visual experience in your shop and draw attention to certain elements of your space.
Here’s how to use color in your visual merchandising displays:
- Use colors to direct shoppers’ attention to where you want them to take notice.
For example, bright, light colors draw the eye more than darker ones. So use eye-catching bright colors to highlight specific products and darker colors to keep the eye moving.
- Limit the number of colors you work with to create a harmonious visual experience. Typically, work with three to four hues at a time, with variation within each color.
- Choose a palette that matches your brand and sales objectives.
For example, let’s say you are a pet supply store, and you want your brand to be family-friendly and evoke images of animals and nature. You might want to stick with earth tones and greens, as these hues elicit associations with nature and comfort.
Scroll through the slides to see visual merchandising examples showing this technique:
Menchies uses bright colors to draw people’s eyes to their soft serve dispenser.
The blue color palette in this luxury store creates a serene and soft environment for shopping. (Source: Adobe Stock)
A neutral color palette creates a modern and minimalistic feel in this grocery store. (Source: Adobe Stock)
3. Adopt Lighting Techniques to Draw Attention to Merchandise & Set Ambiance
Like color palettes, proper lighting techniques help draw shoppers’ attention to specific parts of your store or display. Lighting can also influence the mood and behavior of your store visitors. When done right, lighting can greatly improve your in-store experience and drive sales.
There are four primary types of store lighting that you need to include in your store—ambient, accent, task, and decorative lighting.
- Ambient lighting is the main lighting source for your store and the backdrop on which you will layer other lighting. Ambient lighting should reach every corner of your store. It creates a comfortable environment for customers to explore your space.
- Accent lighting highlights specific products or key areas to indicate their importance and draw the eye of shoppers. It helps guide customers to key products or areas by increasing their visibility or accentuating them.
- Task lighting is used to provide light for a specific task or purpose. Task lighting is used as a supplemental light source anywhere tasks are being done. Examples are lighting up the register, fitting rooms, and office space.
- Decorative lighting includes lighting features that serve an aesthetic rather than a functional purpose. It can be used to embellish your space or add to the ambiance of your storefront. A current trendy example of decorative lighting is custom neon LED signage featuring a brand name or slogan.
To apply a layering technique with your store lighting, here are some tips:
- Place products under brighter lighting to highlight them more than other items.
- Use light to dictate the mood of your display or area. Brightly lit displays are for energy and action, while subdued lighting displays help people slow down or feel more relaxed.
- The lighting’s intensity and color temperature matter. Warm light tones create a cozy ambiance, while cool light tones make spaces feel more spacious and modern.
Here are examples of visual merchandising displays that use retail lighting to their advantage:
A spa wants to create a mellow and calm mood, so it chooses sparse warm ambient lighting for its space. (Source: DesignspiritsCo)
A medical supply store, on the other hand, selects brighter and cooler ambient lighting to maximize visibility and contribute to a more energized and sterile atmosphere. (Source: retaildesignblog)
A smart lighting design can be used to highlight or draw attention from certain products, as you can see in this boutique. Here, accent lighting is used to highlight certain products and draw the eye. (Source: Shopify)
You can also use lighting to create bright visual displays that will catch your customers’ eyes. Decorative lighting is a great way to entice customers.
(Source: Environmental Lights)
4. Use Signage to Direct & Inform Customers
Effective signage can enhance your brand image, highlight products or features, guide your customers to specific items, and share information with your shoppers.
Having an appropriate amount of signage in your store is as crucial as having price tags for increasing sales. Signage includes promo signs, window signs, wayfinding signs, and even safety signs.
There are a few major do’s and don’ts when designing and placing your signs.
Here are great examples of how signages contribute to visual merchandising:
Allbirds uses in-store signage to inform, decorate, and reinforce their brand. Take a look at how they use signage to clearly show customers which category their shoes belong to. (Source: Lisa Hopey)
A well-lit sign outside a Converse store draws customers’ interest. (Source: Starfish Signs)
Folding sidewalk and lit window signs are great examples of eye-catching signage that work well for exterior displays. (Source: Aosom.com)
You can also use signs to help customers find their way through your store.
(Source: Dreamstime)
Exterior displays are all about capturing people’s attention and intrigue; they will often be the boldest visual display in your entire storefront. Think of your exterior signage as the greeting your business gives out into the world. Is it inviting enough to beckon the passerby inside?
Want to learn more about exterior displays? Read our guide to designing storefront signs.
5. Highlight Products With Point-of-Purchase (POP) Displays
Sixty-five percent of people learn visually, and showing visuals can significantly increase message retention. POP displays are a great way to create a visual stimulus around a product and make customers engage and remember your store.
POP displays are temporary digital or physical displays located around products you want to draw attention to or advertise. They can promote product features, showcase deals, break up clutter, or draw attention to an exciting item. POP displays are also great for breaking up clutter in high-volume product areas, filling open spaces, and guiding customers through your store.
Think of your POP displays as one-dimensional employees. Even if they are confined to one product area, they are the expert and key salesperson for that product and can help you sell it faster and easier.
Here are some visual merchandising guidelines when working on your POP displays:
- Identify what products you want to highlight—your personal favorites, best sellers, or even slow sellers that you want to push through. This is up to you and what products you think will get the most benefit from POP displays.
- Make your POP design eye-catching to draw customers in, speak to your brand voice, and fit in with the rest of your store.
- Think about what areas of your store have monotonous shelving or little diversity in product. These might be great places to feature POP displays to help create visual interest and break up repetitive visual areas.
Take a look below at some great examples of POP displays:
This POP display in a home goods store advertises cooking supplies.
(Source: Grand Image Inc.)
This holiday-themed display for tape shows customers right where one of their wrapping essentials is located. (Source: Assemblies United)
This display for the candle brand Oldman & Magpie showcases the wares in one eye-catching spot. (Source: Pinterest)
For more information on how POP displays can work for you and other pop-up display options, check out our article on different display options.
6. Guide Customers With Focal Points
One of the best ways to help guide customers is by creating focal points. Retail focal points are deliberate visual arrangements to create a sensory impact, with the ultimate goal of influencing purchasing behavior.
Focal points do not necessarily have to be overt ads like POP displays. They can also be design features that create a narrative for your customer, like a group of mannequins, a piece of wall art, or a table display. These focal points create visual interest and promote customer involvement without creating a shoppable space.
When considering how you want to place your focal points—and what you want them to be—you will need to think about three main things:
- Traffic flow: Focal points will draw customers in and make them engage with the store area in which they are located. Consider what areas of your store you want customers to engage with. Avoid spaces that can’t accommodate high traffic or direct customers out of your store.
- Functionality: Figure out the kind of focal point you want. Will they be ads or exclusively aesthetic? Will they be shoppable displays or simply visual? This will largely come down to how much space you have to give to unshoppable or aesthetic areas and whether you want to create a more overt ad or a display geared toward just visual appeal.
- Design: Consider how your focal points fit into the rest of your store and your brand. Does this display improve the shopping experience or impede on your space? All in all, you want to determine your display’s utility and how it works with the rest of your merchandising and branding.
Take a look at how these retailers created focal points in their stores:
A focal point display in a home goods store draws attention to new products.
(Source: Juliequidiagan)
This arrangement of the mannequin and tables helps draw people in and guide them to key products. (Source: Adobe Stock)
This cosmetics store is full of small table focal points to highlight brands and new products. (Source: Adobe Stock)
7. Tell a Cohesive Brand Story
At the end of the day, you want your business to tell a story about who you are, what you stand for, and what people can expect from you. Customers crave this narrative—they want to understand and assign meaning to the places they shop. This is where storytelling comes in.
Think of your business’ story as the way you want your customers to describe your store if they were talking about it to a friend. To best tell your story, ensure that each merchandising element makes sense as part of a complete visual narrative. Cohesion plays a major role in creating a discernible story.
For example, if you were starting a gardening store, you might want customers to walk away feeling like they just left a quaint English country garden or maybe a luxurious chateau estate. Both of these stories require different merchandising strategies to make them clear, but, if merchandised effectively, they would leave customers with a clear picture of who you are and the story you are telling.
A great example of effective storytelling via merchandising is the brand Free People. When customers walk away from a Free People storefront, they are left feeling like they just experienced a girly, bohemian escape. Pale colors, soft lighting, whimsical decor—everything fits into Free People’s girly-boho narrative.
Not only that, but Free People’s visual merchandising story is perfect for the brand. Its customer demographic is primarily young girls and its clothing leans toward bohemian style. Thus, Free People’s story is in line with both its customer base and product.
Take a look at how Free People told their brand story through visual merchandising:
Free People uses pale colors and whimsical, girly decor to create a narrative in their stores. (Source: Fashion Network)
The dark and high-tech feel of this store helps to tell a story of innovation and toughness for this outdoor store. (Source: Adobe Stock)
Serene colors and product arrangements tell the story of a home in this furniture and decor store. (Source: Adobe Stock)
8. Leverage Product Placement to Drive Sales
Product placement is a visual merchandising technique in which products are placed thoughtfully and strategically throughout a store to draw attention to them so that, ultimately, customers will be more likely to purchase them.
Product placement can be as elaborate as a focal point display or as simple as placing key items on eye-level shelves as opposed to knee-level ones. Here are some key product placement strategies to consider:
- Cross merchandise complementary items: Putting commonly used items in the same area increases the likelihood that shoppers will purchase multiple products.
- Place more expensive items at eye level: Encourage more expensive purchases by having more expensive items on eye-level shelves and less expensive options below or above people’s line of sight.
- Put impulse-buy products around your cash wrap: Add small, inexpensive items that customers are likely to grab without much thought around your cash wrap. This will keep people shopping and promote more units per transaction.
- Highlight slow sellers with best sellers: Use best sellers to draw customers in and then place slower sellers in their vicinity to boost visibility.
- Put top sellers in the back and front of your store: Entice customers to enter your store by placing key products near your entrance, and then force them to move through your entire space and see all that you have to offer by putting additional best-selling items toward the rear.
Take a look at how these retail businesses leveraged product placements in their stores:
This store placed its most expensive, weighted candies at eye level and its less expensive items near the ground. (Source: Surveillance Security)
This store added greeting cards to its checkout counter to inspire impulse buys and keep people shopping as their things get rung up. (Source: Magento Blog)
Adding top sellers or new products to the front of this store helped draw shoppers in and get them exploring. (Source: iStock)
Learn more about how you can use product placement to boost sales with our guide to retail store design.
Bundle Products to Increase Your Units Per Ticket (UPT)
Grouping or bundling products is the practice of merchandising related products in a group to be purchased together with the goal of incentivizing customers to purchase multiple items in a single purchase. This is a great way to increase your units per ticket (UPT) A common retail metric that measures the average number of items per transaction. and create a more convenient and pleasurable customer experience.
For example, you can display items that could make an outfit together in racks. You can have a sweater hanging on a rack, and on either side of that piece, hang shirts or dresses that could match it and create a full outfit. As customers were browsing, they could see complete outfits rather than disparate pieces and were more likely to buy multiple items and create a full look.
Here are some bundling product display examples:
A grocer bundles all the ingredients for strawberry shortcake together in one display to show customers how the ingredients can work together and encourage a multi-item purchase. (Source: Pinterest)
A men’s store bundles together complete outfits on their wall display so it is easy for customers to see how products can work together. (Source: Pinterest)
Spring decor is displayed together to show customers how multiple items could work together in their homes. (Source: Pinterest)
Related:Retailer’s Guide to Product Bundling
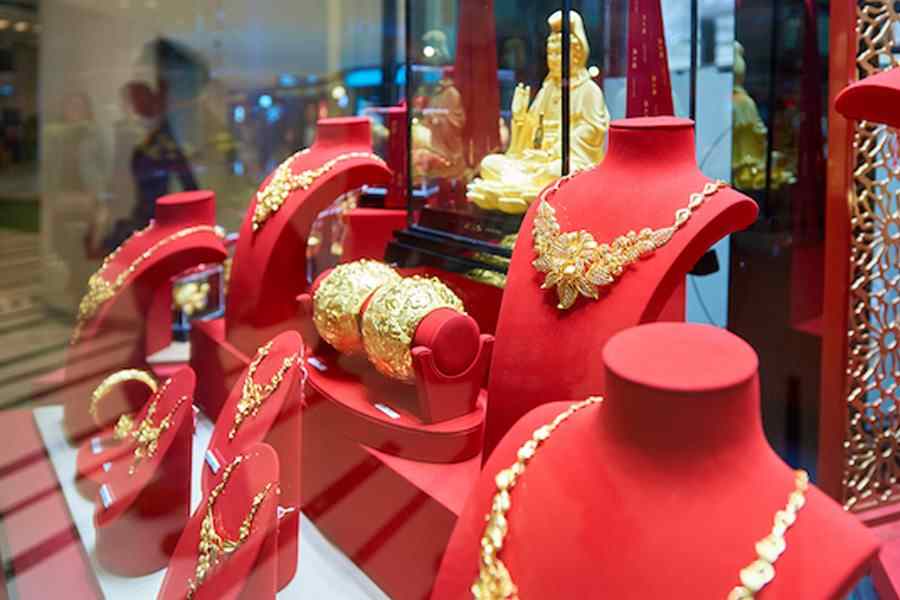
9. Use White Space to Help Increase Product Exposure
In retail, customers often relate space with luxury—the amount of space in a store and in between products convey volumes. Just notice how luxury brands put a lot of space between displayed merchandise and how discount retailers tend to overfill their shelves with items.
This negative space, commonly known as white space, is an essential part of store design. White spaces help highlight products, add focal points, and reduce clutter.
Here’s how to apply white space effectively in your store. Remember, that when this is properly used, white space gives your products room to breathe—and even your shoppers, too!
- When positioning an item as a limited item or exclusive, put more white space around it.
- Don’t display all your stock—not every store corner or space needs to be filled with displays or products.
- Apply white space all throughout your store, not just your shelves or racks—apply the principle in your window displays, point-of-sale, and POP displays.
- If you are doing a sale and want to show shoppers that they can get more bang for their buck, then having additional products on display with less white space makes sense. Still, ensure that you avoid a cluttered environment. Regardless of how much merchandise you have, they must be kept neat and organized at all times.
- Avoid clutter. Maximizing floor space is usually a goal for retailers, but cramped store interiors can overwhelm or confuse shoppers, create traffic jams, and result in missed sale opportunities. Clutter can even make shoppers miss products that they want or need.
Keeping your racks organized with room for looking around will help shoppers buy more. (Source: ImpeccaBuild)
Take a look at how this retailer designed a shelf. They used signage and a mix of products to display them better. (Source: Pinterest)
10. Organize Your Space to Make Shopping Easy
An organized store is crucial to visual merchandising; it helps customers easily find the items they are looking for and limits shopping frustration. It also contributes to a positive shopping experience, encourages favorable customer sentiment, and makes running a store easier on your end.
Avoid shopper and staff frustrations by using a consistent organization strategy throughout your space.
Organizing your storefront starts with creating a system for categorizing and displaying your products. This will largely depend on the type and volume of your products and the space you have to display them. For example, where a grocery store with lots of space and merchandise might want to use a categorical organization system, a clothing boutique with fewer items and less space might want to use color categories.
Whatever you think will make shopping and store maintenance the easiest and most logical is the route you should take. And, don’t be afraid to play around with different organization methods. It might take a few tries to determine what is best for your space and customers.
A grocery store organizes its fresh produce in the same zone to make shopping easy and logical. (Source: Southern Living)
For short, seasonal items, Target stays organized by installing temporary bin displays that can be taken down easily when the time comes. (Source: Adobe Stock)
For stores with lots of different merchandise, categorical aisles are a great organization system for both shoppers and your staff. (Source: Adobe Stock)
11. Connect With Customers Using Seasonal Displays
Factor in the season when planning your visual merchandising strategy. Ensuring that your store merchandising correlates with what customers are experiencing, whether that be a holiday or the time of year, will help your business feel relevant to your audience.
Seasonal displays can take many forms—from POP displays and focal points to window displays and music. Incorporate these to capitalize on seasonal sentiments and buying habits.
Don’t worry; it can be more easily done than you think. Most retailers just let one seasonal display replace another during its window of relevance rather than redoing an entire section of their store.
There are a few things, however, to consider when using seasonal displays:
- Timing: While you want to maximize the time that seasonal displays are effective, you do not want to put them out too early. Get a feel for when the community and other businesses bring out their seasonal displays, so you don’t pull yours out too far in advance.
- Consistency: Don’t let your seasonal display exist in a vacuum. Adding more than one display or small decor pieces throughout your store will make the seasonal displays feel less gimmicky and more celebratory.
- Relevancy: Your brand or market specifically might benefit from highlighting a time of year. For example, for a health and wellness business, advertising cold and flu season or New Year’s resolutions through seasonal merchandising might help make its products more relevant to customers and help people understand the importance of its business at that moment.
Take a look at some virtual merchandising examples using seasonal displays:
A festive Halloween display advertises candy to shoppers.
(Source: Jersey 101.5)
A springtime display draws attention to new spring products and reminds customers of seasonally relevant goods. (Source: Pinterest)
Christmas displays are great for inspiring holiday shoppers and getting them in the gift-giving mood. (Source: KDM Pop Solutions Group)
12. Entice Shoppers Inside With Window Displays
Your store windows present another opportunity to flex your visual merchandising and draw passing traffic into your store. You can display products in a visually appealing way, advertise deals, or even put in an art installation that draws customer attention.
The primary goal of window displays is to get customers through the door. It is wise to invest time into getting it right. Your window display should be attractive and make customers want to know more and also help them understand what is going on inside.
However, ensure your window displays are not misleading for the sake of creating a statement.
Here are some ways to be strategic with your window displays:
- Remember that your window is one part of your overall store design. Make sure it matches your store’s overall decor, style, and branding once a customer is inside.
- Redesign your window displays often. Keep up with trendy themes, but still keep the previous point in mind.
- Show off bestsellers and exclusive products to entice customers into making a purchase.
- Have fun with it! Window displays are one of the few places in visual merchandising where your display doesn’t have to be shoppable (though, it certainly can be!) and can entirely focus on visual appeal.
Here are some window display examples of great visual merchandising:
A fun and colorful window display (Source: TDF Asia)
In addition to design, you can display your promotions in your window displays to catch people’s attention. (Source: Adobe Stock)
There are no limits on window displays, as they are the one area of your store that does not have to be shoppable. (Source: Adobe Stock)
Frequently Asked Questions (FAQs)
Click through the tabs to learn more about the most asked questions about visual merchandising techniques.
Follow these visual merchandising strategies:
- Direct customer traffic with your store layout
- Use color to create a cohesive visual experience
- Adopt lighting techniques to draw attention to merchandise and set ambiance
- Use signage to direct and inform customers
- Highlight products with point-of-purchase (POP) displays
- Guide customers with focal points
- Tell a cohesive brand story
- Leverage product placements to drive sales
- Use white space to help increase product exposure
- Organize your space to make shopping easy
- Connect with customers using seasonal displays
- Entice shoppers inside with window displays
Visual merchandising is displaying products in a retail or digital space to highlight their features and benefits with the purpose of attracting, engaging, and motivating customers to purchase.
Branding, engaging the senses, and displaying products effectively are the basic elements of visual merchandising.
Retail product merchandising is displaying 1) the right merchandise, 2) in the right quantities, 3) at the right time, 4) at the right price, 5) in the right place.
The four elements of visual merchandising in a retail store are its 1) exterior (marquees, window displays, and entrance), 2) layout (selling space, personnel space, and display space), 3) interior (the store design like floor and wall coverings, fixtures, and lighting), and 4) display (the way of presenting merchandise).
Bottom Line
Visual merchandising affects every customer-facing aspect of your business. From your brand voice to customer experience to sales, visual merchandising is much more than just arranging products in an aesthetically appealing way.
Keeping all the techniques and tricks that this article reviewed in mind will allow you to create a storefront that is not just beautiful but also in line with what your business stands for and the experience you want to create for your customers.